 PROPER TESTING PROCEDURES:
What to do to truly develop your racing program.
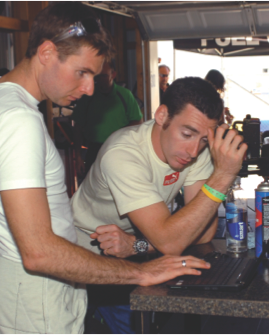
NKN tests a lot of karting products. Most of the time this involves going to the track and getting some laps in – an excellent perk! Years ago when working in Indycar racing, I was one of the few guys who actually enjoyed going to the track for the long and monotonous days of testing –that’s where I learned the most. And out of all this testing, I get one reoccurring question from many karters (phrased many different ways): “How do you test?”
That’s a deep question and has lots of possible angles. However, for many karters the first question that needs to be answered is: do I need to ‘test’ or do I need to ‘lap’?
Here’s the simple difference: testing is learning how changes on the chassis and/or engine setup effect performance. On the chassis side, testing is determining what different geometry changes, different bolt-on parts, and the combination of both affects the performance. For engine testing, it might be different carburetors or carb settings, different exhaust lengths, different fuels and oils, and/or different engine builds (like different port heights via base gasket changes).
Lapping, on the other hand, is just that: pounding laps. It’s the repetitive process of making laps around a track to improve the driver’s line and consistency. Lapping is not pitting every three to five laps and making any chassis change. Ninety percent of karters would be much better off lapping. Ninety-nine percent of karters under the age of twelve should just do lapping days at their track.
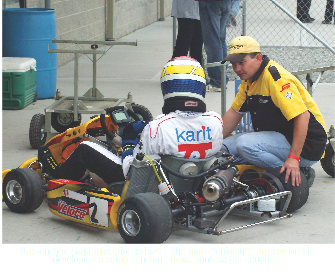
For a lapping day, the toolbox should be simple and light. Bring an air pressure gauge, chain lube, and fuel. While that might be bit of an exaggeration, it’snot far off. The setup on the chassis should be the ‘baseline’ setup the factory advises you to begin with, and the engine should be ran a bit on the conservative side (for example, a bit richer and/or lower RPM than race-recommended). The idea is to pound 100+ consistent laps ~not caring about the lap times, just the fact the driver can hit his/her marks every time. This is not testing. This is learning to drive a kart near its limit of control as consistently as possible.
The baseline setup the manufacturer provides with the chassis should be at least 90% as fast and comfortable as anything you come up with while testing”. Also, by lapping with this setup, you will understand the inherent design characteristics of the chassis better. Even though they all look the same, no two karts are driven the same!
So now that we’ve established the difference between testing and lapping, when do you know you’re ready to “test”? There are a number of opinions on this.
When working in “big car” racing, you always thought you were testing. Some drivers, you were merely making changes to shut them up. It’s the same in karting.
 Assuming the baseline setup is on the kart and the engine is functioning properly: if the driver is more than three quarters of a second off the pace on your average kart track (8-12 turns), he/she probably needs laps. It takes restraint to not tell dads and karters who are four seconds off the pace and blame the chassis, tires, or engine (when I can see all are good) that it’s not their driving. Sometimes, we all just need more laps to figure it out!
On the other hand, if the driver can shut their eyes and guide their kart around the track with one hand (exaggeration again) and they’re less than .4 seconds off the leaders, maybe a developmental test is what they need for their chassis, engine, or other components!
There are different tests in motorsports. Often, to do any more than one properly in a single day is nearly impossible. First, establish what you are testing: chassis setups, engine tuning, or tires. In the following paragraphs, we’ll outline procedures for testing any and all of the above; however, testing in motorsports is very goal specific and unique to the specific driver, team, and equipment. For that reason, use this as just an overall theory on testing procedures, not a guideline.
Chassis Testing
It is very easy for karters of any experience level to look at a time sheet at a race and panic if they’re not on the leader’s pace. They may listen to six different people at the track (all of whom are on different chassis). And the next step is usually “throwing the kitchen sink at it” –making a large number of guesses on the setup in hopes they’ll make up the lost time. This isn’t proper operating procedure. Don’t panic, a couple of days of testing can help.
Before leaving for the test, there is some homework to do. First, know the baseline setup the chassis manufacturer recommends. We’ve heard the phrase, “that kart is fast out of the box,” that baseline setup is what they’re referring to… Many importers and manufacturers have this setup online or available to email or fax to you. Laminate it –that setup is your starting point and “reset” point if you ever get lost. Second, study the track you’re going to run: know the lap times for your class, know how the track changes, has there been a big event lately to “rubber-in” the track, etc. Also, know that your engine package is solid and consistent; it doesn’t do much good to go chassis testing if you spend the whole day tuning the motor.
The final thing to do before leaving for a test is to make a list of the parts and changes you want to test. There is a logical order to doing this, and that is somewhat based on your kart’s baseline setup. For example, 90% of the time, OTK produced chassis run the “N” axle. So your first changes probably would not be axles. That being said, you don’t want to waste time with fine tuning adjustments and remain half a second off all day.
There are two ways to do a general chassis test. One is to establish a goal for the testing. For example, “today we want to know how the chassis is effected by changing front bars”. Therefore, after a few baseline lap times and feel is established, the first 40 laps of the day’s testing will be trying four different front bars.
When learning a new chassis, one typically uses the method of testing described first –let’s call it the “development testing” (because you’re developing a database of knowledge on the product). The karter’s goal here is to learn what the chassis does when a change is made. How change X effects the turn-in, apex grip, and exit handling, for example.
NKN does a lot of chassis evaluations every year, and when time permits we like to use this method of testing to really learn what the chassis does. Below is the list of things, in order, we do/would do when “development testing” a chassis:
How does seat position effect handling: recommended, forward, backwards, raised?
How does a softer and harder axle effect handling?
Third bearing hooked up or loose?
Second set of seat struts?
Rear ride height: neutral, high, or low?
Front ride height: neutral, high, or low?
Different front bars?
Addition of rear and/or side torsion bars?
Increase/decrease front and rear track width?
Increase/decrease Caster?
Increase/decrease Camber?
Toe in/out 2mm from stock?
+/-3 psi of tire pressure: front/back?
Different wheels: aluminum vs. magnesium?
In theory, each change does the same thing on every kart; a law of physics right? Not always and never to the same exact amount on different brands of karts. Over the years, I’ve switched between many brands of chassis and more than once have had to “relearn” how to tune the new chassis.
The other method of chassis testing is the Pyramid method, where you “build” on the baseline setup. Start with changes to the “big things” (seat position, axle, ride height) and then moving up the pyramid to the small, fine-tuning adjustments that give you the ultimate lap time. This method is typically used when testing at a track in preparation for a specific event. One thing to be cautioned about when using this pyramid method: Know how the track changes throughout the day or weekend.
There isn’t a specific order to the changes, but the idea is to eliminate the big stuff first (while you have the time) and be at a point to make the small changes when the clock is ticking. Another tip to deciding what and/or how much to change using the pyramid method is to assign numbers according to how poorly the kart is performing.
For example, the driver comes in and says the kart is oversteering. The tuner asks, “on a scale of 1-5, five being the worst, how bad is the kart?” Driver replies: “four”. This probably requires a big change: seat position or axle change.
Tuner: “Where does it begin to get loose?”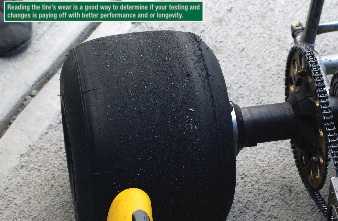
Driver: “As soon as I turn the wheel, it’s like I’m on ice. The kart has no bite, it’s on top of the track.”
Solution: softer axle and allow the chassis to flex more; therefore, getting the tires to ‘bite’ into the track harder. An axle change is a big step in building the bottom of the pyramid for chassis testing. It’s not a quick change or something you want to change three times in a day.
After the next run, the driver says, “It’s still loose, but a 2-2.5 and only from apex off.” This is a middle step on the pyramid, and might be a softer front bar or a track width adjustment –something that is easily changed back after the next run. For this example, let’s assume a softer front bar is the answer by reducing the amount of rotation in the rear of the kart from the corner apex off.
Finally, the driver says, “It’s nearly perfect. There is a slight bit of oversteer on the exit of the corner.” The tuner has reached the top of the pyramid and raises the rear air pressure by .5 psi! This was an over-simplified example of a pyramid test, but it’s a great illustration how to narrow the problem down via “big changes” first. It may make a Thursday or Friday at the track busier, but less stressful than if you were at the same point on Saturday.
While data acquisition can help in developing or learning a chassis setup, this is still primarily a feel thing for the driver and a visual thing for the tuner. No commercial system on the market designed for karting can accurately tell you if, for example, oversteer was decreased 20% by the last change. Data is there to support and reaffirm what the driver and tuner believe they are respectively feeling and seeing.
Chassis testing takes time, whatever method you chose to use. Chances are, you will not complete every reasonable change in one day. Also, it is important to know that what works (and to what degree it works) in April may not be the same in July when it’s 25º warmer and there is a 1/2” of rubber on the track. To develop the optimum setup or knowledge base on your chassis: Plan on testing in every weather condition possible!
Engine Testing
In this era of high technology and laziness, you’re probably asking, “Why would I need to test an engine? My builder dynos them and tells me what to set it at.” True, but the dyno doesn’t always simulate the real-world track. Have you ever heard, “This engine is as good on the dyno as X’s who’s winning all the nationals,” then later discover it can’t get out of it’s own way? For that reason, we test engines before going on-track race weekend with them.
Engine testing is a lot more “black and white” than chassis testing. Are you going faster thanks to added horsepower and/or a better usage of the power you have? Engine testing is about numbers: RPM, speed, and time, plain and simple!
If the chassis isn’t working and the driver can’t hold onto a consistent line the engine test might be useless. Also, if the chassis is good and the driver is trying to set a track record every lap, the information might be flawed. You should also know if the track is greatly effected by temperature, wind, or other conditions. A track like New Castle Motorsports Park changes up to four seconds between 10am and 3pm in the spring. This can flaw the results too. To properly test an engine the chassis, driver, and track need to be as consistent as possible.
Like chassis testing, there is some pre-track homework one must do to have a successful engine test. If you have multiple parts to test, know each part’s setup and specs. For example, if you’re going to test Yamaha Supercan carburetors and the dyno says: “carb one is the highest peak horsepower, but carb two has the widest power-band from 10,300 to 11,800 RPM” know which is which and where the carburetor’s optimum needle settings are. If exhaust is tunable (for example via different flex lengths), have the different lengths cut before you go to the track.
Occasionally, engine testing is exactly that – Swapping engines that the builder has set up in different ways to figure out which port height, cam (4-cycles), ignition timing, etc. is better. When doing this, it is important to eliminate as many variables as possible. Use the same carburetor, clutch, fuel, and exhaust system if possible. This will give the builder the best results for the internal engine differences.
Evaluating different gears, trying different clutch stall speeds (where applicable), and exhaust systems is also part of engine (driveline) testing. The main thing to consider when evaluating any engine change is to keep as much consistency as possible by only changing one item at a time. Additionally, one change can affect the other. For example, a better carburetor might increase RPM 300 revolutions and require the operator to drop a tooth on the rear sprocket to keep from running out at the end of the straight.
Data acquisition is much more valuable with an engine test. With different parts or engine setup, the speed and RPM curves can easily be seen when overlapped and any differences can be seen. Looking in more detail, the engine builder can zoom in on the top of the RPM graph to see if the line is consistently rising or begins to level off (stop pulling).
Ultimately, a successful engine test will probably come down to the stopwatch (assuming the driver is being as consistent as possible on the racing line). The combination that provides the highest straightaway speed, gets off the corners at the highest RPM, and provides the lowest lap times will trump all others.
Tire Testing
At NKN, we’ve completed a lot tire tests. I’m proud to say we’ve been key test drivers in developing sprint tires for many Burris, Hoosier, and MG and of course we’ve tested Bridgestone, Dunlop, and Vega for numerous articles over the years. Tire testing is a blast for us!
Again, establish your goal(s). Are we looking for speed, consistency, longevity, or repeatability over numerous heat cycles?
To start any tire test, it’s best to have a set (new or used, but of the compound you are testing) to establish a baseline setup. It’s not fair or accurate to test Bridgestone “B” (medium) tires on a setup developed around an MG HZ (hard) tire.
Again, before hitting the track there are some things you need to know. What is the optimum hot pressure for the test tire? What is the ideal operating (hot) temperature? Do I need to balance them before running? What is the roll out (stagger) of the tires?
First, establish a baseline setup that is “neutral” on used tires. It shouldn’t be too easy to drive, but too much sliding will negate the results of the test. Look at the tires for “graining” (or that cheese grater look) on the tires –this will tell you if the tires are over or under inflated and if you have too much positive or negative camber. This is known as “reading a tire”, and is a topic for a whole other article.
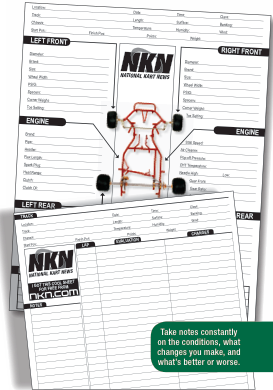
Before each test run on the tires, note the cold pressures. And after each run, note the hot pressures, temperatures, circumference, and number of laps completed. These notes will give you the information onto which to build your results.
With a comfortable base setup established, it’s time to bolt on the new tires. Chances are your fastest laps with any new tire are going to come in the first five laps of the first on-track session. It’s known as the “golden lap”; very few tires get it after the first heat cycle. So if you’re going to do an absolute time/speed run this is the time to do it.
After that ‘mock qualifying run’ to gauge the absolute speed of a tire, the rest of the testing is used to evaluate the wear and consistency of that tire over it’s life. Questions to consider are: how many heat cycles till it “fell off” .5 seconds, how many laps or minutes of running did it take for the grip to be gone, and where was the wear seen first (front or rear, center, inside, or outside).
Finally, when evaluating tires, the track must be a major part of the consideration. Is the surface smooth or rough? Is it known as a ‘new tires are best’ track or can used tires compete strongly here? Does this track usually require camber to negotiate quickly?
Remember, what works at Ocala Gran Prix might not work at Daytona or Jacksonville –both less than 100 miles away. More so than chassis or engines, the keys to a successful tire test are notes: learning what the product does, what it likes to perform better, and being able to adjust to it when the conditions change.
Conclusion
Once you’ve established you are ready to “test” and that you don’t just need “lapping days”, it is important to set goals for each time you go to the track to test.
After a karter learns the value of a true “testing” day, he/she will quickly realize how important testing is. The hard work done before the next event will pay dividends at the next race, and you will have a much more relaxed and focused event.
Visit www.nkn.com for copies of our testing, setup, changes, and other valuable sheets that can be printed off and help you the next time you build your notebook for success at the track!