HOTRODDIN’ THE PREDATOR
By Gary Costanza
Every once in a while, a manufacturer of these clones will change something that will make any good cloner stop and say, HEY, Maybe I can use that for racing. OK, maybe that happens all the time and in this case it’s the new 212cc Predator motors from Harbor Freight. Priced in the neighborhood of $159.00 and less if you can find them on sale, these base motors come with some real nice surprises.
The first one is obvious. Its 212cc’s compared to 196cc or 208cc for all the other 6.5hp clones, making it the biggest so far. And bigger is better, Right? Let’s see.
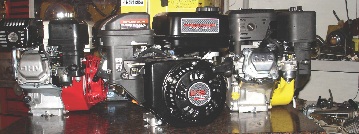
Coming in with a 70mm bore and a 55mm stroke makes this bad boy “King of the Hill” when it comes to size. The 196cc clones have a 68mm bore and a 54mm stroke while the 208’s are 70mm bore and 54mm stroke. OK, so I’m thinking this little shining black gem is stroked and bored right out of the box. How could I resist taking a peak to see what else could be hiding beneath that menacing black exterior?
Another pleasant surprise was the castings and finish. Unlike the grainy castings of many of the other clones, the Predator is closer related to the Honda as far as detail and quality. It comes with the usual features found on most clones. lt has a governor system to 3900rpms, on/off switch, low oil sensor shut off, gas tank, air box and filter system, check oil caps at both ends, spark arresting exhaust system, pull starter and meets EPA emissions standards. What a deal, right? Let’s take a look.
First, we need a baseline horsepower and torque number. That means a trip to see Dr. Dyno and “The Search for the Truth” begins. Before starting any process that involves change, it’s always good to have an idea of what you have to start with. And a dyno is as good as it gets for this. In order to meet EPA standards you will find these clones are jetted very lean. In fact, they are too lean for what we want. Usually, the clone’s main jet is #70. I have found that #85 - #90 works better at most elevations and should get you in the ballpark and on your way to making safe and reliable power.
The other jet of concern is the pilot jet. And that is located just under the idle screw adjuster. Normal pilot jets are in the range of .014”. We want .020” to richen up the
bottom end, and help with acceleration off idle, and through the low part of midrange just before the main jet takes over.
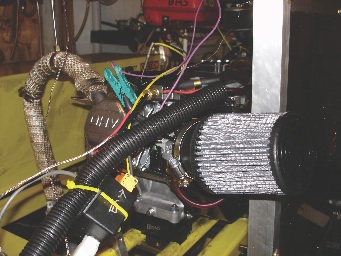
So off comes the gas tank to be replaced with an aluminum top plate for added strength. Then the air box and stock filter to be replaced by a K & N racing style air filter and adaptor. Next, let’s complete this motor’s breathing improvements and get rid of that very restrictive exhaust system and spark arrestor for an open pipe into Dr. Dyno’s exhaust analyzer sensors. Add some of your favorite oil and we are ready for our appointment with the good Dr.
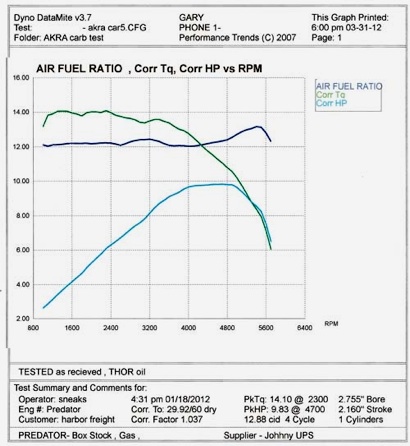
Our Predator fired right up without hesitation and ran smooth for its 30 minute break in. The new jetting was much to her liking with smooth acceleration and crisp throttle response. Ungoverned, the Predator was very anxious to turn more rpm’s than the manufacture would like to hear about. After warming up to a head temp of 275˚ I laid the hammer down and let Dr. Dyno take over. The manufacturer stated 6.5 horsepower at 3600rpms. With the improvements we did our test results were closer to 9 horsepower at 3600rpm with maximum torque pulling 14.10 ft. lbs. at 2300rpms. The maximum horsepower of 9.83 was achieved at 4700rpms. Power started dropping off at 4900rpms and we hit a wall at 5600. I believe some valve float was limiting our revs after that.
So before we can search for more power we need to address the issue of the valve train. I am targeting the 6500rpm range for this build and will be changing from gas to methanol as our fuel. I will do another dyno run to see just what the change in fuel alone will do to the power curve.
My Initial impression is some good power making potential exists with this bored stroker as a base motor. It’s time to see what’s under all those aluminum covers and tins starting with the head.
You don’t have to remove the head just to change the springs. However, I’m going to install new SI stainless steel valves while I have the Predator apart. Like all clones, there are only 4 head bolts securing the head to the block. No surprises here. This has always made sealing these motors challenging when modifications to compression and bore have taken place. There are many suppliers who have seen the need for us cloners and have come to the rescue and are making all kinds of high performance “plug n play” go fast parts. Like modified heads, racing cams, forged pistons, roller rocker arms, light weight flywheels, and the list goes on.
This Predator head will have stock size stainless valves, 25mm intake and 24mm exhaust with automotive style split keepers. Those 10.8lbs. stock valve springs will be replaced with 26lb springs to control that valve float. And 1.3 ratio rockers to give us a bit more lift, and some mild cleanup of the ports.
To help support the valve trains extra spring and rocker pressure we will replace the mild stock steel pushrods with a set of chrome molys. Thanks to the suppliers we now have choices from adjustable aluminum to “Do it yourself” kits to make any length you want. This will come in handy if you do any milling of the block or head.
Once you pop the top off, you will notice 2 more surprises. First, the piston position in the cylinder at top dead center is just .003”from the deck. Now any cloner worth a roll of duct tape knows what this means. Most clone piston positions are more like .030” below deck requiring long
er rods and different pistons to get any compression. Even though this is a dish style piston, a .003” “in the hole” piston is a huge advantage.
The second surprise is the Predator comes with a .050” thick head gasket. With the wide variety of head gaskets from su
ppliers on the market today, this is another area where we can pick up some compression by using a thinner one. In this case I will be using a large profile .016” copper head gasket. Some form of gasket sealer is always a good idea. Now that we have increased the compression we need help keeping the lid on. High strength metric stud kits are available and do a great job in this area. Metric stainless steel bolt kits are also available and
work well.
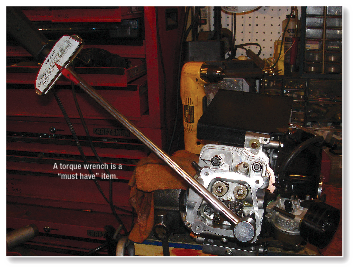
Now that we have made the needed changes to the head its time to reinstall and torque it all back down on the block. The stock head torque values are 17ft. lbs. With the studs you can go up to 24ft. lbs.. This will help in keeping the beast sealed.
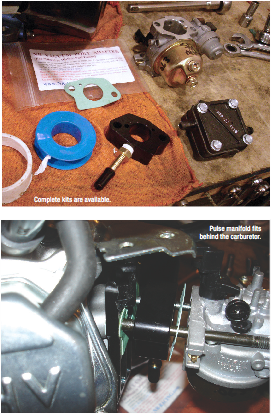
The switch from gas to methanol will take some carburetor jetting changes. However, there are many suppliers who will be more than happy to help you with this fuel conversion. They sell “Plug n Play” carburetors that take all the guess work out of choosing which jets to use. The price ranges from $49.00 to $125.00 for blueprinted carburetors, depending on your needs.
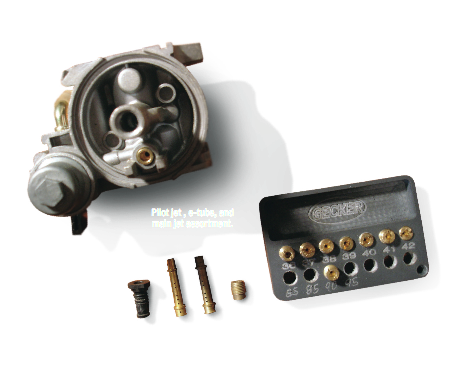
Now, if you happen to be a member of the “PoBoy’s Greasy nails” club, like me, then you’re going to do this yourself and save the money for nonessential items like clothes or rent.
And all you really need to do is drill out the pilot jet, the emulsion tube or E-Tube, and the main jet.
Depending on where you live will determine which jet size combo works best. Some experimenting will be needed. The range for the pilot is .026” - .032”. This will effect off idle and early acceleration out of the corners. The main jet range will be from .056” - .064”. This controls the mixture at wide open throttle or WOT. The E-Tube will need to be bigger than the main jet. If it’s not already, than increase this to a minimum of .074”.
In case you haven’t figure this out already, then let me tell you this isn’t going to be good for your mileage. Expect to use twice as much alky as gas. That lost mileage however, will be replaced by a big ole grin when you hammer down. Now, in order to “feed the beast” with its new found appetite we will need to install a fuel pump.
All fuel pumps that we use for the clones are pulse activated. So, we need to pick up a pressure signal from somewhere. Again, our friendly suppliers step in with this behind the carburetor pulse fitting adaptor that will give us just the signal we need. You can pulse from the crankcase or valve cover as well, but that gets messy keeping the oil out of the pulse line.
One last issue needs to be addressed before we can fire up. The cast flywheel is not intended for use above 4000rpms, so we once again turn to our clone parts suppliers for a safer flywheel. And this comes in many forms.
As of this writing there seems to be some issues on which flywheels fit the Predator best, so check with your local dealers before you order. And while we have the old cast flywheel off we can use modified keys that will advance the ignition timing from 20 degrees stock to at least 28 degrees or more. These modified keys come from suppliers in advancements of 2˚, 4˚, 8˚ and 12˚. Alcohol loves advanced timing and 30-32 degrees seems to be the “sweet spot” for circle track racing. If drag racing your minibike is what you do then 34-36 degrees would be a better sweet spot for you guys.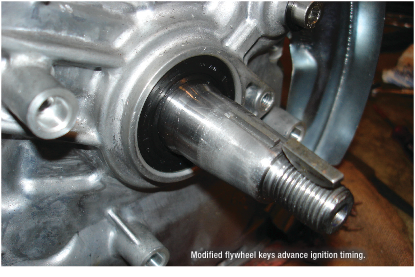
Be sure when you install your new flywheel that you move it clockwise so the new modified or cut key rest against the left side of the flywheels keyway. This will advance the position of the magnet in relation to ignition timing.
All that’s left is to set the coil/flywheel air gap as per the manufacture spec sheet that will come with the wheel.
A word of CAUTION is needed at this point. If your going to pull start this modified Predator, you will need to slowly pull the rope until you feel the compression stroke before you yank, Then yank and let go. If it backfires, and they do, it will pull the rope/handle right out of your hand and that really stings.
When we get this all done our Predator will start to look more like a racing motor than something that belongs on a log splitter.
Now our Predator is ready to face Dr. Dyno for the second time. With a new thirst for power there is nothing left but the truth to tell us how we did.
 The first thing you will notice is how long it takes to warm up. Exhaust temps have been reduced from 1500 degrees to a near frigid 1200 degrees. Condensation will start around the carburetor as little droplets of water when the cold mixture runs through the bore. Head temperature was hard to get above 225 degrees when Dr. Dyno took over.
While guzzling alky at an incredible rate your beast pulled a maximum horsepower of 12.13 at 4800rpms and a maximum torque of 16.03ft lbs. at 2200rpms. That’s an increase of 2.3 horsepower over gas and it increased rpm’s by 700. This beast on alky easily pulled over 6400rpms. The torque not only increased by 1.93ft. lbs. but the maximum occurred 100 rpms lower. Lowering the torque’s rpm range is always a good thing.
Any cloner would be very pleased with results like this. With some carburetor wizardry, a pair of springs, and a new fuel, our Predator is ready to be set free in the wilds to prowl on any unsuspecting ANIMALS that may be lurking around at the local tracks. And we haven’t even opened up the crankcase.
Not yet anyway, but I’m having dreams of racing cams, bigger carburetors, flat top pistons, billet rods, roller rockers, chrome moly, and who knows what other ‘Go Fast” parts are out there. I’m seeing a part 2 here.


 PART 2


 Another external bolt-on.