SCALE & ALIGN YOUR KART
By Mike Unger
So you have your kart ready for the track right? You’ve rebuilt the engine, replaced all of the fuel lines and cleaned it all up. All systems go for a successful racing season right? Well you did align and scale your kart right? No? ARE YOU OUT OF YOUR MIND! Going to the track without aligning and scaling your kart and expecting to do well is kind of like putting cheap gas in a high performance race car. Technically it will work, but it won’t give you the results you want.
I use very simple and straightforward tools to align a kart. Of course if you want to use a $1000 laser alignment system, feel free. I use a set of alignment disks. Alignment disks are available from most any kart shop for around $75. Those, along with a 6ft tape measure with at least 1/16 inch graduations, a bungee cord or a set of vise grips and you have all the tools you need.
Put your kart up on a stand so you can work with it. Take the wheels and sidepods off and put the alignment disks on the front wheels. Take a long bungee cord and hook it on either side of the steering wheel and loop it around the seat. Then adjust the bungee cord until the steering wheel is centered the way you want it to be when the kart is going straight. This is called setting the spoke angle. If your kart has a plastic upper steering support you can set the steering straight ahead and then use a set of vise grips to pinch the support around the steering shaft keeping it from moving during the alignment process. Some people don’t like this idea because it can mark up the plastic.
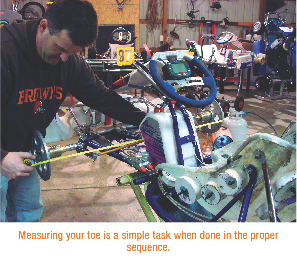
The first step of the squaring process is to measure the distance from the centerline of the front spindle to the rear axle on both the right and leftside of the kart. This is the key measurement to get your chassis square. Most karts have a small detent in the center of the spindle making it very easy to eyeball the measurement. If your chassis doesn’t have the center of the spindle marked, simply use the front or rear of the spindle axle itself. Carefully measure both sides of the kart. If the two measurements do not equal each other you will need to adjust the tie rods accordingly until they do equal. Just loosen the tie rod jam nuts on both ends of the tie rod and turn the tie rod accordingly on the side you need to change. Continue to adjust the left and right side until both are exactly equal. Don’t worry about the toe at this point, just make sure the distance between the spindle and the rear axle is equal left to right. Keep the tie rod lock nuts loose for now since we will need to do more adjusting when we set the toe.
The toe is simply how the front wheels are angled inward or outward relative to exactly straight ahead. To measure the toe simply measure the distance from the front of the right alignment disk to the front of the left alignment disk. If these measurements are equal, the toe is set to zero and your chassis is properly aligned. Toe in is when the distance between the front of the left and right alignment disks is smaller than the rear edges of the right and left disks. Toe out is the opposite. For most karts a good starting point is zero toe or slightly (1/16 in) out. In order to change the toe and keep your chassis squared you will need to go back to the distance between the rear axle and the spindle measurement to change your toe. If the chassis is toed in, you will need to shorten that distance by turning the tie rods in (make them shorter). If it is toed out, you will need to lengthen that axle to spindle distance by turning the tie rods out (make them longer).
Always change the toe by using the axle to spindle measurement as the main basis for change. Make sure you always keep that distance equal when changing the toe. Also it is important to repeat these steps when you change caster, camber or front ride height. Those changes can change the alignment of the chassis. In the end you can do a good, accurate alignment job inexpensively and simply. Oh, and before you finish the alignment, use a permanent marker and put a mark on the steering shaft and upper steering support to indicate where straight ahead is. It will be useful later. Be sure to tighten down the jam nuts on the tie rods and put the wheels and side pods back on.
Ok, now your chassis is aligned and ready to be scaled. You should get the recommended weight percentages from your chassis dealer as a starting point. If you can’t get that info I suggest 43% front weight on the front tires and no more than 1lb difference between the front wheels and no more than 2lb difference between the rear wheels. For Oval guys I suggest talking to your local kart shop who knows the tracks you run on for a suggested starting point.
It is very important to use a good set of scales designed for scaling cars or karts for this procedure. I know we have all heard that four $19 bathroom scales will work, but to be honest they simply won’t. Bathroom scales are spring scales and by design get thinner when weight is applied. Because karts have no suspension that deflection will give you false readings on the corners of your kart. Go borrow a set of scales from a friend.
To get your project started you will need to find a fairly level piece of concrete or asphalt to set you scales up. I am lucky enough have a friend who not only has a nice set of scales, but also a nice leveling stand. This makes setting things up so much easier.
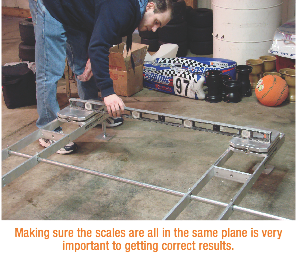 You will need a large, 3ft long or more, carpenter’s level to set the scales so they are all in the same plane. After you have all 4 pads set in place and approximately where they need to be to match the karts wheelbase and track, you need to check the level front to back and side to side. This is a simple matter of setting the level directly on the pads and adjusting the height of each pad until they are all level left to right, front to rear and even diagonally if your level is long enough. This step takes some time but is very important to get right.
After the scales are leveled turned on and zero. I recommend you step on each one as a final check to make sure they all read the same. It would be worthless to scale your kart to a set of broken scales. After that you will need a friend to help you from now.
You will need a clipboard and if your set of scales doesn’t calculate front percentage automatically you will need a calculator. Your kart will need to be exactly like you would expect it to come off of the track at the end of a race. Sidepods, engine, tires and so on need to be ready to race. I also recommend you put enough fuel in the tank to represent the lowest you would ever expect the tank to be when you come off the track. I know many people carry extra fuel as ballast and since it weighs 6lbs per gallon it is an important factor.
As far as your tires and tire pressure I recommend measuring the circumference of each tire to make sure they are similar. Try to get them within 1/4” in of each other from right to left. To adjust the circumference, increase or decrease tire pressure accordingly. Don’t worry so much about getting them perfect because I doubt you will be mounting up 4 sets of tires and matching them all up into matched sets during the season.
OK, with your helmet on and clothing similar in weight to your race suit (or your actual race suit) you and a friend place the kart on the scales. You will need to have your buddy hold the brake to keep the kart from rolling off the scales as you get in the seat. After you get in apply the brake and make sure the steering wheel is straight ahead. Remember that mark you put on the steering shaft to indicate where straight ahead was after you aligned it? Have your buddy check and make sure it is all lined up. Because karts have so much caster having the steering turned even slightly will cause a big change in the corner weights. Now with the steering straight ahead and both hands on the steering have your buddy record the reading from each of the 4 scales. Make sure they get labeled right front, left front, right rear, and left rear. After that is all recorded, have your buddy hold the brake again while you climb out.
The first thing to look at is the minimum weight. I recommend you setup your kart about 3-5 lbs heavier than the minimum for your class. It would be really lousy to win the race only to get DQ’d for something as simple as the minimum weight. I recommend adding weight only to the seat since that is where most of the weight is (mainly you). If you spread the weight out you will make the kart more difficult to change direction so keep the lead centered to the seat area if you can. Think of it like a figure skater doing a spin. If she keeps her arms in, she spins fast. She puts her arms out she spins slow. You want to be able to spin fast. When adding weight make sure you use at least 5/16 inch bolts with conical washers on the seat side and either double nut each weight or use nylon locknuts and safety wire. WKA now requires all weight to be painted white and any piece of ballast that is over 7lbs to be attached with at least two bolts.
To calculate the front weight percentage, use the following equation:
Front % = ((Right Front + Left front) / Total weight)*100
This will give you the front weight percentage. Again try to shoot for what your manufacturer recommends. If you can’t, a good rule of thumb is 43%.
Look at the front weight percentage and add weights accordingly. If the front percentage is low add weight to the front of the seat. If the percentage is high add weight to the back of the
seat. With all the weight attached put the kart back on the scales and repeat the procedure and record the new results.
Now it’s time to look at each corner, are the front corners within 1 lb of each other? Are the rears within 2? Here are a couple of scenarios to help you understand what to do.
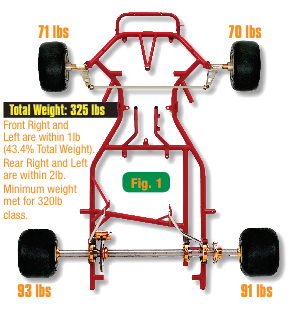
Figure 1 Shows a near perfect setup for a 320lb weight class. Here you can see that the front wheels are within 1 lb of each other and the rears are within 2lbs. If you can get this kind of balance you are done.
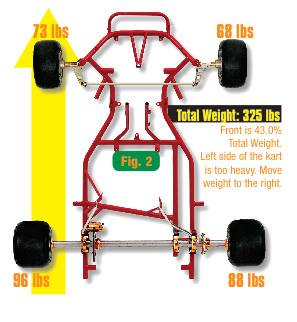
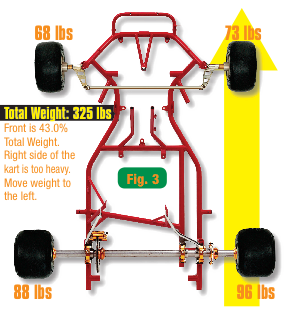
Figure 2 Shows the front percentage is OK, but the right side of the kart is too heavy. To correct this move some weight from the left side of the kart to the right side of the kart. To keep the front weight percentage correct I recommend picking weights near the center of theseat. If the left side of the kart is too heavy
do the opposite.
Figure 4 Shows that some work needs to be done. The front wheels are off by 4 lbs and the rears are off by 5lbs. In this case, of the 4 wheels, the left front and the right rear are the lightest of the 4. This indicates that the chassis is a little twisted or the alignment is not correct. Go back and re-check the alignment to be sure. If it is OK don’t panic. The first thing you need to realize is that kart frames are mass produced and made of steel. That means two things. First it means than even with the tightest quality control a frame can be produced with the kind of balance shown in figure 4. Second, it means that since it is made of a bendable
material (steel) you may have tweaked the frame the last time you battled for that championship win, or hit that big curb one too many times, or stepped the rear wheel off in that hole at the exit of the turn, or dropped it the last time you unloaded it from the truck…anyway you get the idea.
OK, like I said there is no reason to panic, frames get bent a little and they can be bent back. There are 2 ways to fix the problem. First and by far the easiest way is to adjust the front spindle height. This is done by removing the long bolt that holds the spindle in the yoke and moving around washers. In the case of Figure 4 the left front wheel is light so you need to lower the spindle in the yoke. To do that you need to put more washers above the spindle than are below the spindle. In the case of Figure 5 the opposite is true.
The second way to fix such a problem described in Figure 3 or 4 is to try to bend the frameback to where it needs to be. For some smaller diameter tube frames (30mm or
smaller) this technique generally works. For larger diameter frames I have not had so much luck, but your results may be better than mine. To do this I usually put a couple blocks of wood under the wheel that is too heavy and then carefully jump on the waist of the frame. Be careful not to jump on the tie rods as you will be doing an alignment again. You also need to be careful to not fall on your butt and hurt yourself. You will find you really don’t need to jump with both feet just one foot firmly applied will usually do the trick. After each ‘jump’ re-scale the kart. From the results you will get the idea of how much weight you need to out into it. If that technique doesn’t work or doesn’t completely work move the spindles around as described above.

Finally, if you are like me and just barely make weight with zero weight on you get to do it the long way. You see if you are like me and weigh 200lbs you do have a bunch of weight to move around. The only problem is you have to reposition the seat to do it. I recently scaled my new kart and the right side was 5lbs light compared to the right side. I remounted my seat 1/2” in to the left and rescaled it. Even though it took an extra 2 hours, everything was right on when I put it on the scales again.
In the end you have your kart all aligned and properly scaled. Make sure you take your time and recruit a buddy to help. It will take some time, but be assured it will pay off big on the stopwatch.